The Full Name of an object, which is defined by TestComplete, can be difficult to work with. For example if you have a long object name with special characters, typing and reading it can be time consuming and prone to typing mistakes.
Let us say a textbox in a web page has the following name.
Sys.Process(“iexplore”, 2).Page(“https://www.google.com/accounts/ServiceLogin?service=mail&passive=true&rm=false&continue=http%3A%2F%2Fmail.google.com%2Fmail%2F%3Fui%3Dhtml%26zy%3Dl&bsv=llya694le36z&scc=1<mpl=default<mplcache=2&from=login”).Table(1).Cell(0, 1).Panel(“login”).Form(“gaia_loginform”).Panel(“gaia_loginbox”).Table(0).Cell(0, 0).Panel(0).Table(“gaia_table”).Cell(2, 1).Textbox(“Email”)
This is not a simple bit of text to work with. To overcome this issue we can use the NameMapping feature. In the above mentioned object, from the text “Sys” to “Textbox(“Email”)” we can create a Mapped name for every object and use it in our scripts.
If you want to learn more about the basics of how name mapping work see our post on How the Name Mapping works in Test Complete.
After creating Name Mapping for every object, we can refer to the object as follows.
NameMapping.Sys.IEProcess.Page.MainForm.CellMain.LoginPanel.Loginform.Loginbox.Login
Table.LoginCell.LoginPanel.LoginTableObj.CellObj.EmailTextbox
It’s clear that this is easier to read. Even though it is easy to read, still the name is too long. It will be difficult to remember all the Mapped names & their hierarchy. So you end up getting the full mapped name of the object by using the object spy. As a result productivity goes down because you have to go through several steps to pick out the name.
To resolve this problem, we can use Alias names. From the above mentioned mapped name, we can remove a few objects and create a short name. For example the Aliases name of the above object can be given as follows.
Aliases.IEProcess.Page.EmailTextbox
This becomes very easy to read and write. Also we can easily memorize the names of required objects alone and type them in our scripts (without the help of the object spy). As a result productivity goes up.
In this example, we will see how to write an automation script for a log-in action in Gmail using the NameMapping & Aliases concepts.
- Open a new project in testcomplete. Add ‘NameMapping’ project item (If it is not available) using the following steps.
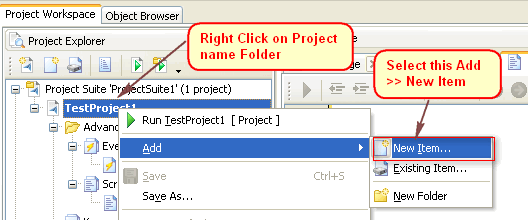
- In Project Explorer, Right click on Project Name folder and select Add –> New Item option
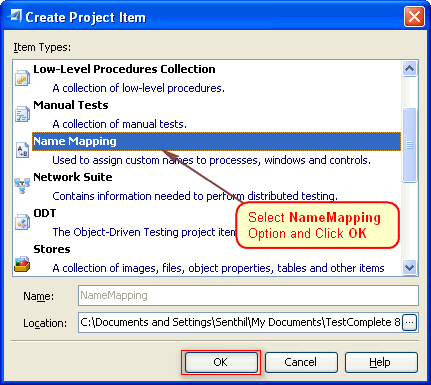
- In “Create Project Item” window, Select ‘NameMapping’ option and click OK.
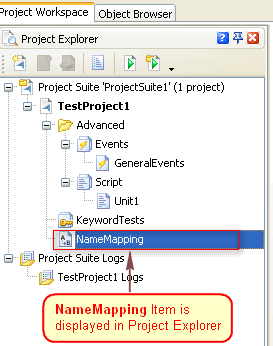
- Now in Project explorer it will show the “NameMapping” Item.
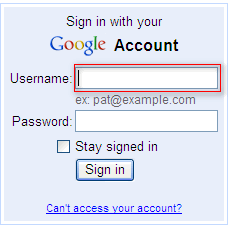
- In Internet Explorer, open the www.gmail.com page. Now we are going to create, Mapped names for the objects on which we are going to perform actions. Here we are going perform actions on Username Textbox, Password Textbox, and Login Button. So we will Map these objects.
- First we will Map the Username Textbox.
- Click on ‘Map Object From Screen’ button in tescomplete toolbar.

- It will open Map Object window. Drag the Finder tool to the Username Textbox and release the mouse button. Now the “Object” textbox will show you the Full Name of the Username Textbox. Click OK button.
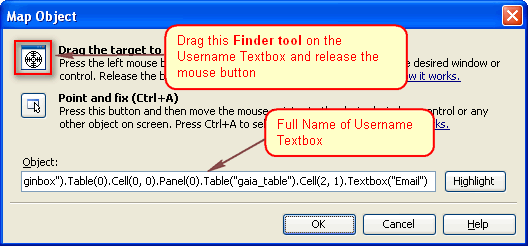
- Now it will ask you to Map all the Parent objects of Username Textbox before mapping it.
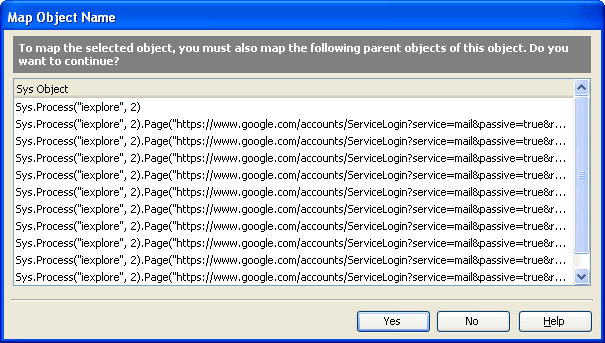
- Click Yes in that window. Now you have to Map all the objects in the displayed window and finally it will show the Username Textbox. First it will show you the IE process object in Object Mapping window. I.e. Sys.Process(“iexplore”,2)
- Give a Mapped name. It should be a readable and clear name.
- Select some required properties from Available Column list for unique identification of
object (if needed) or remove some unwanted properties from selected column list (if needed)
and Click OK button.
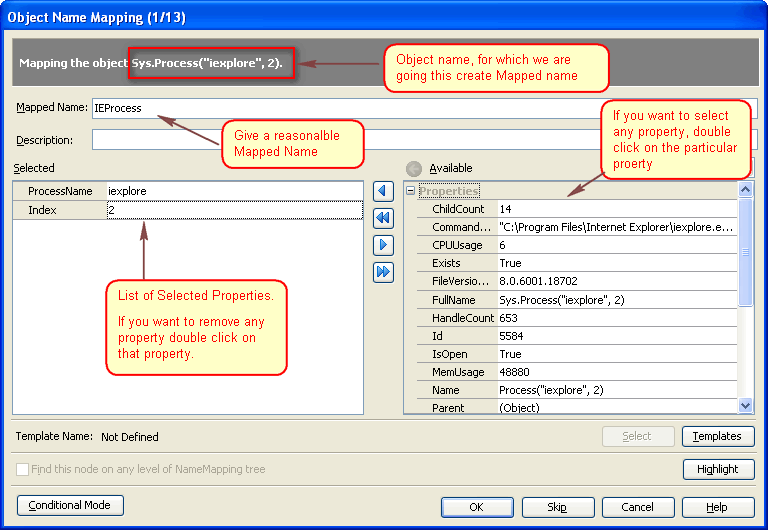
- Now it will ask you to Map the next parent object of Username Textbox. As mentioned above in Step-7 Map all the Parent & Username Textbox objects.
- Once you have mapped all the Objects, double click on the ‘NameMapping” project Item. It will show the Name Mapping window. In this window you can see the Mapped Objects in a tree format. You will also see the Alias names which are created by default (in the same hierarchy as the Name Mapping).
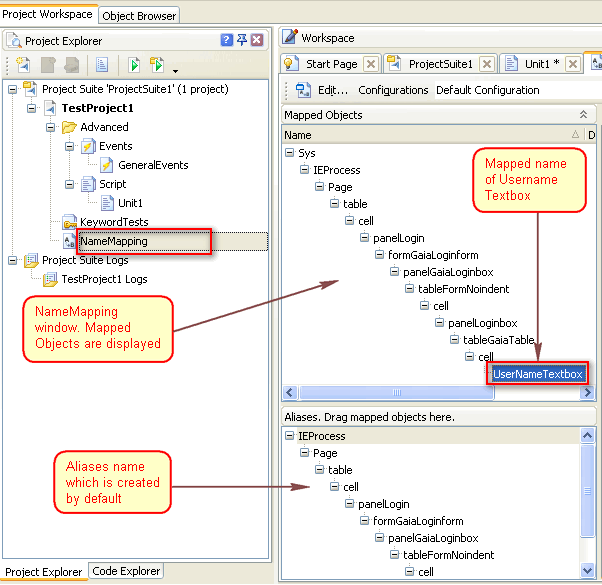
- If you use this default Aliases name, it will come to the same length as Full Mapped name. To remove the names of some unwanted higher level objects, do the following.
- In Mapped Objects window, select the object on which you are going to perform actions. Drag that object from Mapped object window to Aliases window and drop under an object. Once you’ve done this the name will become very simple with just the important objects at the top level.
(Here we are going to perform action on UsernameTextbox. So drag it and drop it under theObject ‘Page’ in Aliases window).
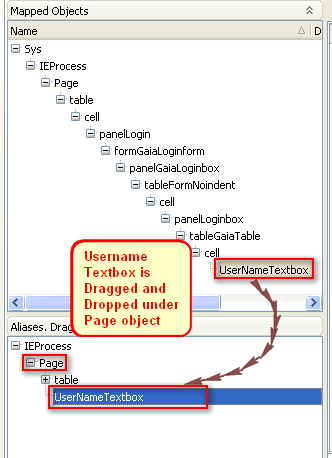
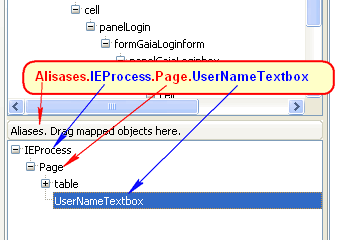
- Now you can refer to the Username Textbox as follows
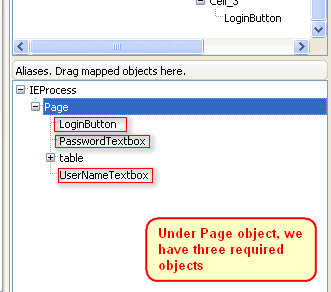
- Now Map the Password Textbox and Login button in the same way and drag them under the Page object. Once this is done, you should have the Aliases name as follows.
Alisases.IEProcess.Page.UserNameTextbox
- So now you can use the following code to perform the Login action.
function LoginGmail()
{
var pageObj = Aliases.IEProcess.Page
pageObj.UserNameTextbox.SetText(“myUsername”)
pageObj.PasswordTextbox.SetText(“passwordTb”)
pageObj.LoginButton.Click()
}

- If you record the same action, without creating these NameMappings & Aliases you will get the following script. It goes without saying that this is very difficult to read and understand.
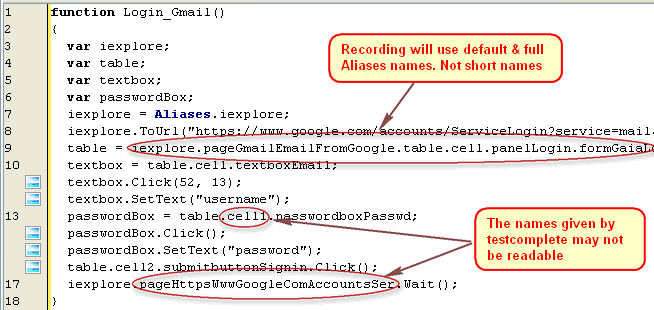
In summary you can create Mapped names and Aliases for any object. You can then use those names while writing scripts to make working with Test Complete far easier.


