TestComplete has many features to simplify test automation script development work. One of them is Name Mapping. Using this feature we can create a Mapped name using the properties of the object in our application. We can then use this name to refer to that object in our scripts. But why should I create a Mapped name? What are the advantages of doing this?
Let us consider the following example. In a web page we have a button, a ‘Login Button’. In the process tree the full name for this button is as follows:
Full Name of Login button: Sys.Process(“iexplore”).Page(“*”).Form(“main”).Button(“button1”)
If I use this Full Name in my test automation script to refer the button it is easy to get confused. Afer all the developer creating the web page has used a name for the button (‘button1’) that is not exactly very descriptive. In short the developer of this application could have done a better job naming the objects here. Also this name is cumbersom to use in our test automation scripts (it’s a lot of typing with brackets, double quotes, etc). Apart from all of this it is very difficult to read.
To solve these issues we can use Name Mapping in our test automation scripts. If we do this we will see the following advantages.
To understand what name Mapping is and how it works in test automation, the following analogy may help….
You are going to a Book shop to buy books. You have selected a book and you have decided to buy it in bulk. You want to contact the Manager of the shop to place this order. So you ask an assistant in the book shop,“where is the Manager?” He says “The manager is on the third floor”. But on the third floor there are 30 or 40 people. So you ask “how do I identify the manager in that crowd?” The assistant says “He is very tall and today he is wearing a red shirt. “ Now you are heding to the third floor to search for the person who is tall and wearing a red shirt. You find that there is only one tall person in the crowd with a red color shirt. So you know this is the manager and you can place your order.
You didn’t know the manager in this shop when you started. So how did you find him correctly? In your mind you have related the person who is tall and wearing a red shirt as the Manager of that shop.
In your mind, you created a Mapped Name of “Manager” for him. You searched for a tall person with a red shirt. Once you found the (only) person who met these criteria, you knew that he was the Manager.
To identify him you used two properties. You found him because there was no other tall person with red color shirt (I.e. these were unique properties for the manager).
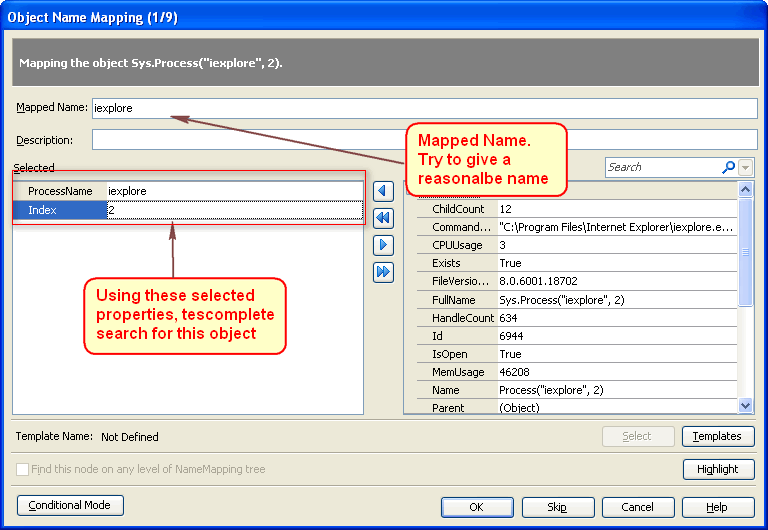
Name Mapping in Test Complete works in the same way. Using the selected properties, TestComplete identifies the object using the properties and assigns a Mapped name to that object.
While creating a mapped name for an object you are following these steps as part of your test automation process.
You can see this in practice in the following Object Name Mapping dialogue in TestComplete.

Let us consider the Login button in our test automation example. While mapping this object, we should select a few properties for the button. You then provide the Mapped name as “LoginButton”. Let us say we selected the following two properties.
| Property | Property value |
| ObjecType | Button |
| Value | Login |
If you now use this Mapped Name in your automated test scripts to refer this button, you are saying to TestComplete:
“Search for an object with these two properties (Object type = Button, Value = Login). Please call that object LoginButton.”
Now TestComplete will search for the object which has the specified properties and when it finds that object it calls it the ‘LoginButton’. From there we can tell TestComplmete to perform the required actions on our ‘LoginButton’ object.
Bear in mind also that you should Map every parent object before you Map the child objects. In our example, to Map the Child object ‘Button(“button1”)’, you should have mapped its parent object. While mapping objects, TestComplete will list all the parent objects for you and ask you if you want to map the parent object. In this way you can map all objects you will need to manipulate in your test automation scripts.