We’ve already come across the basic concepts of the Project Suite and the Project. Remember that one Project Suite is the container for multiple Projects. Beyond this though we find a few further levels in this hierarchy. A project can then contain multiple test cases. A a test case can have one or more test steps.
In the image below we see the top level project suite called ‘CalcProject Suite’. Under the ‘CalcProject Suite’ we find 4 projects.
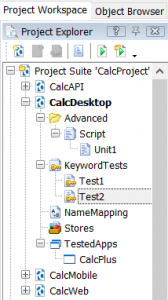
CalcAPI, CalcDesktop, CalcMobile and CalcWeb are all projects contained within the single project suite. Then we can take the ‘CalcDesktop’ project and we can see that this project contains two test cases (Test1 and Test2). Drilling further down we could then examine the tests themselves and see that these each had multiple test steps within the test. When it comes to executing our tests we can execute at all of these levels.
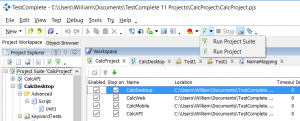
At the Project Suite level we can click the ‘Run Project Suite’ button. This will then run all the projects that are enabled within the ‘Project Suite’ work-space. Running each project will in turn run all of the tests enabled within that project too.
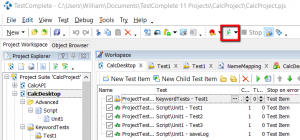
Or alternatively we could run just a specific project. When we click on the run button for the project we execute all the enabled test cases that are listed at Test Items within the project work-space.
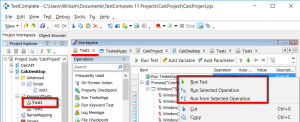
If we want to run individual tests then we can open the test and use the right hand context sensitive menu option to pick ‘Run Test’. If we want to go a level deeper then we can select the ‘Run Selected Operation’ or ‘Run from Selected Operation’. The first one only executing the selected test step, the second one running the selected operation and all subsequent test steps.
The Project Suite concept, as you’ve probably raised, is quite a simple concept and just acts as a container for multiple projects. It’s at the project level where things start getting interesting. We’ve seen how you can run all the tests contained within a project but how do you select those tests within the project?
Well once you have the Project work-space open you can build your test project up by dragging in test cases from the Project Explorer pane….

Note that not only can you drag a test in, but you can drag it in multiple times in order to repeat the test and/or construct complex workflows by dragging in multiple tests from your project.

You can also organise and construct logical workflows by using the folder and test manipulation buttons to create hierarchical structures and groups of tests. In this way you can reuse and organise your tests as you need to create logical structures of tests. All part of the powerful test case reuse capabilities provided by TestComplete.
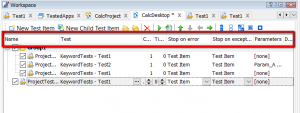 Next then it’s worth talking about the columns you’ll find in the project work-space. You’ll see column titles and fields for Name, Test, Count, Timeout, Stop on Error, Stop on Exception and Parameters.
Name is a custom name you can give to this instance of a test item in the list. Test is the actual test name (as seen in the Keyword Tests list in Project Explorer). Count is the number of times you want to run that test and timeout is how long the test will run for before TestComplete moves on. The Stop on Error and Stop on Exception values tell TestComplete what to do if it encounters and error. And the Parameters field allows you to set the parameters fed into the test as it starts (so the same test case can be feed with different parameter values each time it runs).
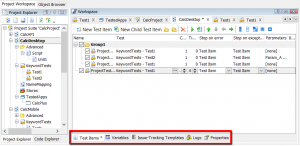
The only other thing to quickly mention on the project front at the tabs at the bottom of the work-space panel. You’ll see the Test Items tab is selected by default, which is what we’ve just been looking at. We also have Variables, Issue Tracking, Logs and Properties.
Variables allows you to define and set project level/scope variables (more about this in a future module). Issue tracking templates allows you to create issues and build templates for creating those issues. Logs gives you visibility of test run results when the run was started at the project level. Then most important is the ‘Properties’ tab. This is where you can specify the ‘project level’ properties. We talked a lot about this in the Options and Settings module.
And that’s about it on the Project and Project Suite side of things. In short these entities are just repositories used to help you organise and manage all of your test artifacts. How you split these artifacts and test efforts across your projects and project suites is one of those “it’ll come with experience” aspects of learning TestComplete. One that we’ll touch on in later modules.