Workflow & Status
If you’re looking at tracking work tasks the simplest way of categorising the pieces of work you have is with a few simple status values like ‘To Do’, ‘In Progres’ and ‘Done’. In Jira terms you’d have your issues tracking those pieces of work. Each issue then would be set with a status value of ‘To Do’, ‘In Progress’ and ‘Done’.
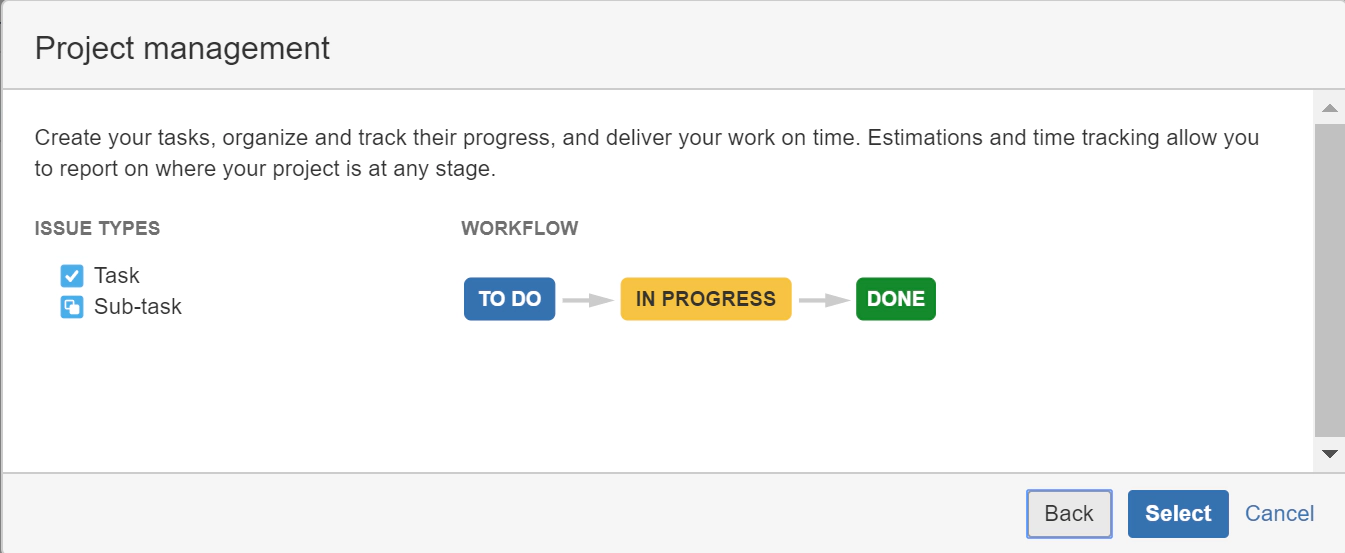
When you haven’t yet started a piece of work the status is set to ‘To Do’ on the issue. When you pick up the piece of work and start working on it you move the status value for the related issue to ‘In Progress’. And obviously once you’ve finished the work you move the status value to ‘Done’. These are the status values given to a basic workflow configured in Jira. This workflow is shown below:

What do we mean when we start using the term ‘Workflow’? As we’ve already mentioned we can give the issues in Jira a status value. When we talk about workflow we’re refering to the transitions between the status value. So we have a transition from ‘To Do’ to ‘In Progress’. A transtion from ‘In Progress’ to ‘Done’. We even have a transition from ‘Done’ to ‘To Do’ (if we find out later that we still have work to complete on the issue).
When we talk about workflow we’re refering to both these status values that an issue can have and the allowed transitions between those status values. In Jira we can configure the allowed transitions. We’ll want to configure those transitions so that they make sense to the way we work on our projects. We’ll want to configure the status values too so that they relate to the way in which we work.
Let’s look at a practical example of this. We’ll walk through the creation of an issue and moving that issue through the workflow, transitionaing the issue through the different status values.
Taking an Issue through the workflow
When you first create your issue it’ll be given the starting status value in the workflow. In our setup this is the ‘To Do’ Status and is displayed here in a new issue:

When you start work on this issue then you’ll click the ‘Start Progress’ button.

It’s this act of clicking the ‘Start Progress’ button that initiates the workflow transition from ‘To Do’ to ‘In Progress’.

At this point you’ll see you have two paths in the workflow.

From ‘In Progress’ you can move back to ‘To Do’ or move on to ‘Done. You can select which of these paths to follow by clicking on the ‘Stop Progress’ or ‘Done’ buttons.

Of course if you click the ‘Done’ button that invokes the transition from ‘In Progress’ to the ‘Done’ status and you’ll see your issue with this status value set.

Quite simple really. Trust me though, as you add more status values the complexity of the workflow and paths between different status values start to increase. More complex workflows bring their benefits in terms of tracking more detail and modeling more complex real world workflows. It’s just modelling that real world complexity can make configuring Jira and working with Jira more complex too. There’s always a trade off.
In the next few sections we’ll look at how you select different workflows when you create a new project. We’ll also look at how to change the workflow for an existing project to a new workflow.
Selecting the Initial Workflow
When you create a new Jira project one of the dialogue boxes you get presented with is the Create Project type selection options.
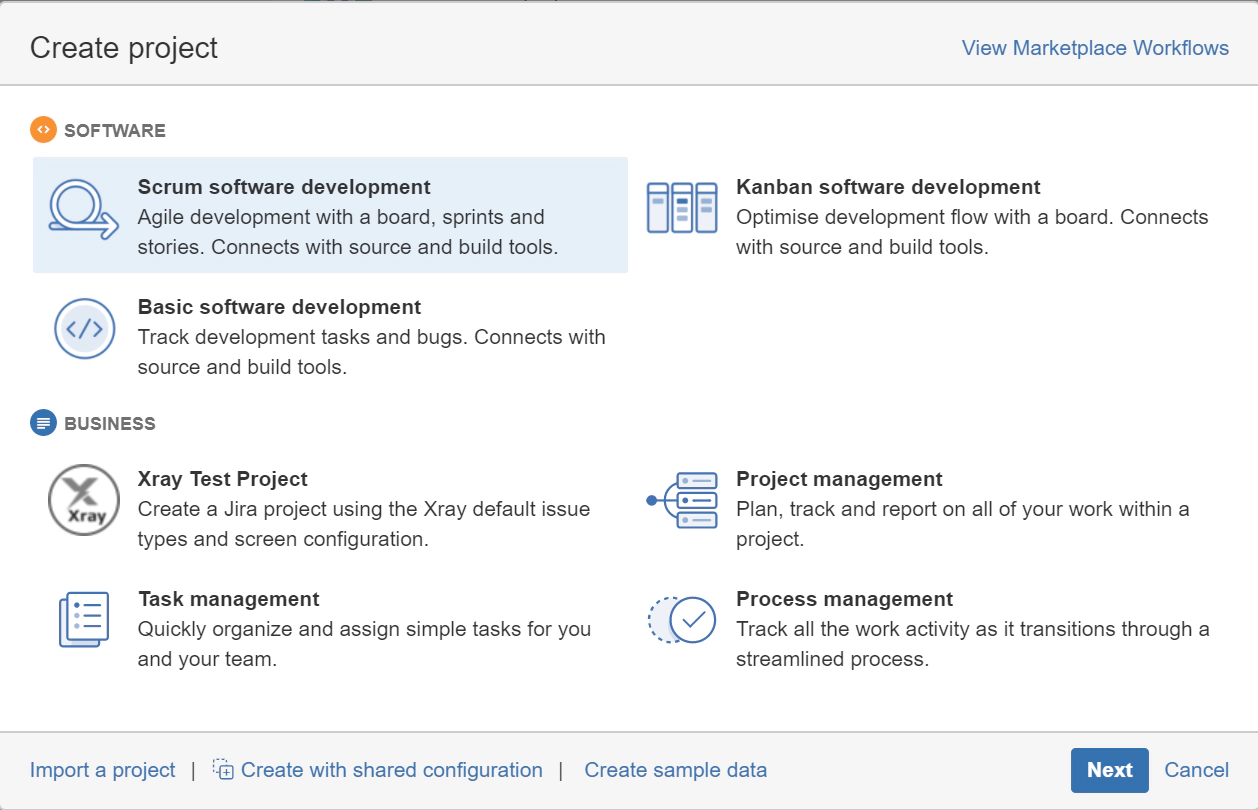
It’s the option that you select on this page that determins the initial workflow and status values that your new project will have. In fact after you’ve selected your project type Jira shows you this workflow and the assoicated status values
Once the project has been created you can view the workflow applicable to the project here:
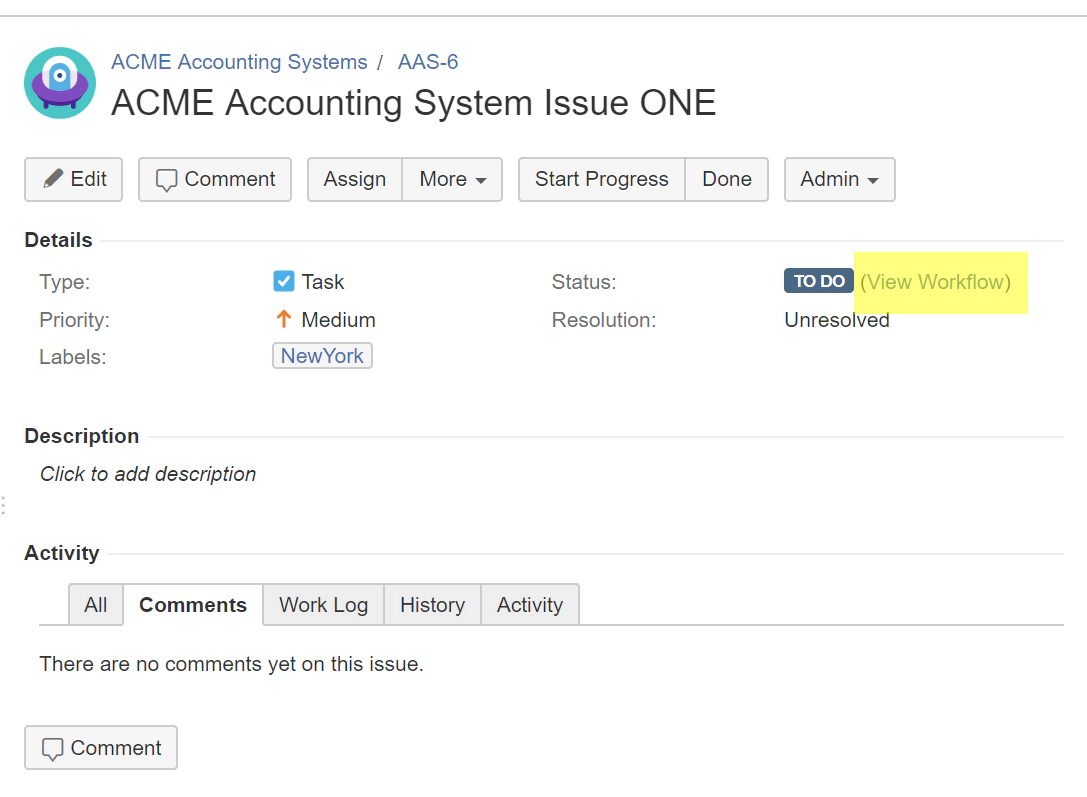
When you click on the ‘View Workflow’ link Jira will show you a diagram representing the status values your Jira issues can have and the transitions that are possible between those status values.

Viewing Workflow Schemes
If you want to change the workflow for an existing project or create your own workflow (with associated status values) things start to get complicated. Jira workflow functionality is incredibly flexible but with that flexibility comes complexity. We’ll cover the full process of creating your own workflows in a future module. For now though lets just take a look at how to see what pre-configured workflows are available and how to change your projects workflow.
We can build a workflow specifically for a project. Actually, in Jira terms, what we really do is build a ‘Workflow scheme’ and assign that scheme to a project. Workflow schemes allow you to define workflows and then apply the scheme to a project. A workflow scheme can therefore be assigned to one or more projects. In this way you can define a workflow once and easily assoicate it with a project (rather than building the workflow from scratch each time you create a new project). This concept of schemes also means you can apply a workflow consistency across projects. And when you make changes to a workflow scheme that change is then applied to all relevant projects automatically.
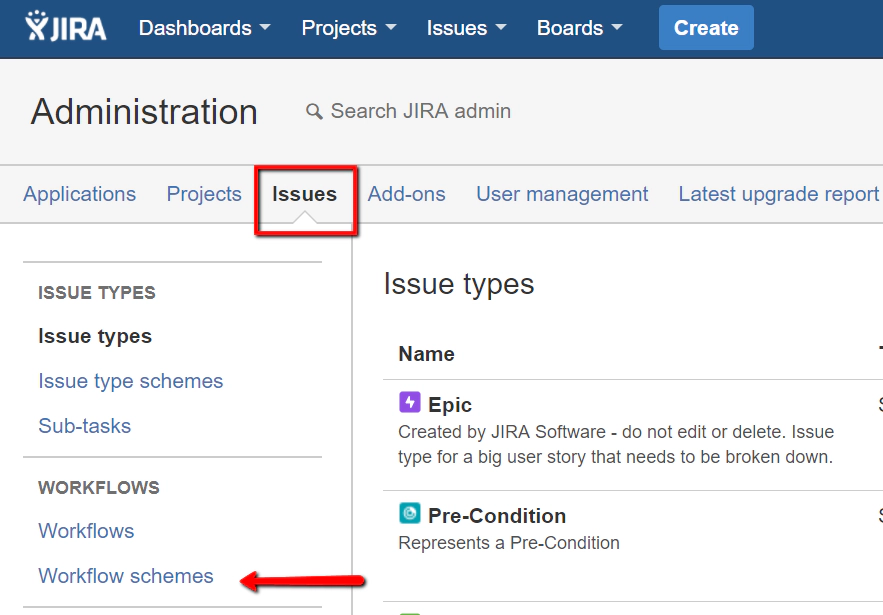
To view the workflow schemes that are already defined in your Jira system click on the Admin drop down (cog icon, top right on the page) and select ‘Issues’
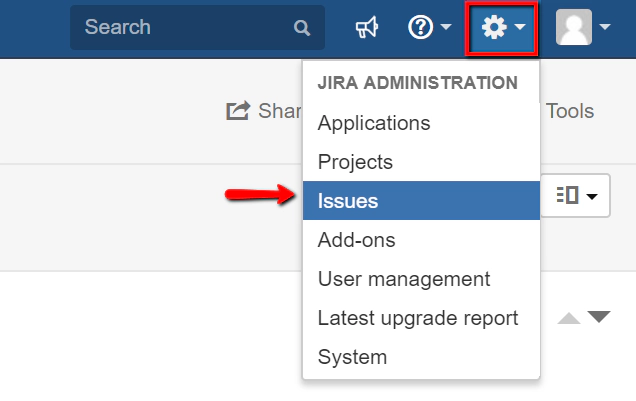
On the ‘Issues’ admin page you’ll find a menu list on the left hand side. You need to pick ‘Workflow schemes’ here.
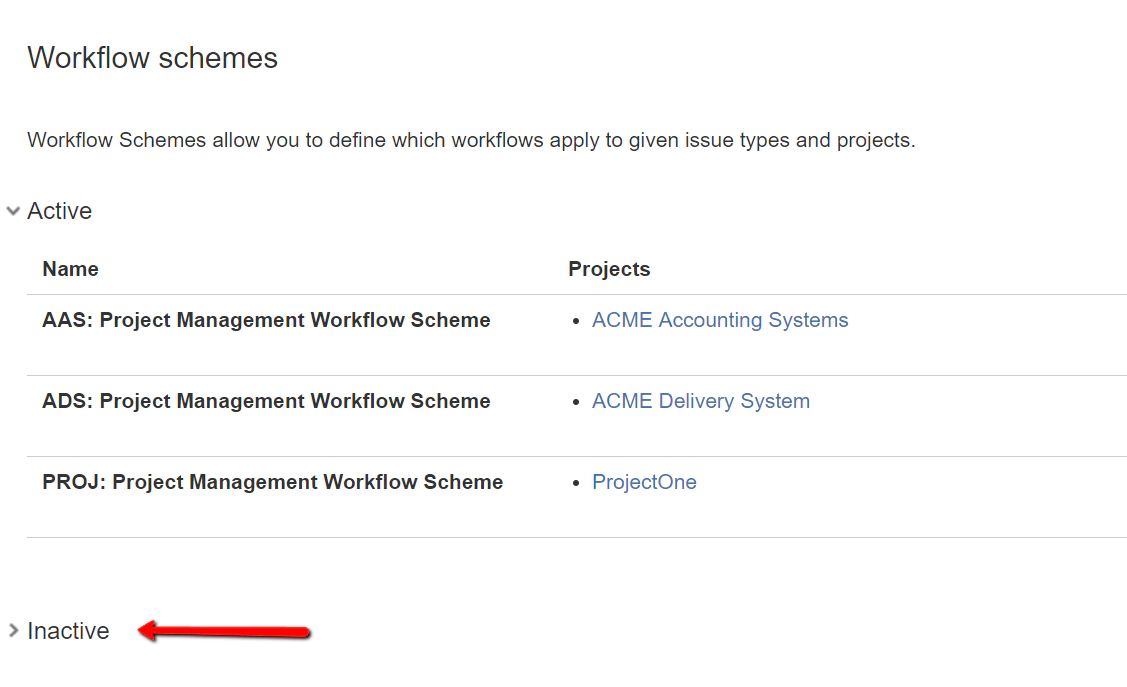
This page gives you a list of all the workflow schemes defined on your system. Well it almost does. Some of them are hiding. Click on the ‘Inactive’ option to show the defined schemes that are available but which aren’t being used by any projects currently.
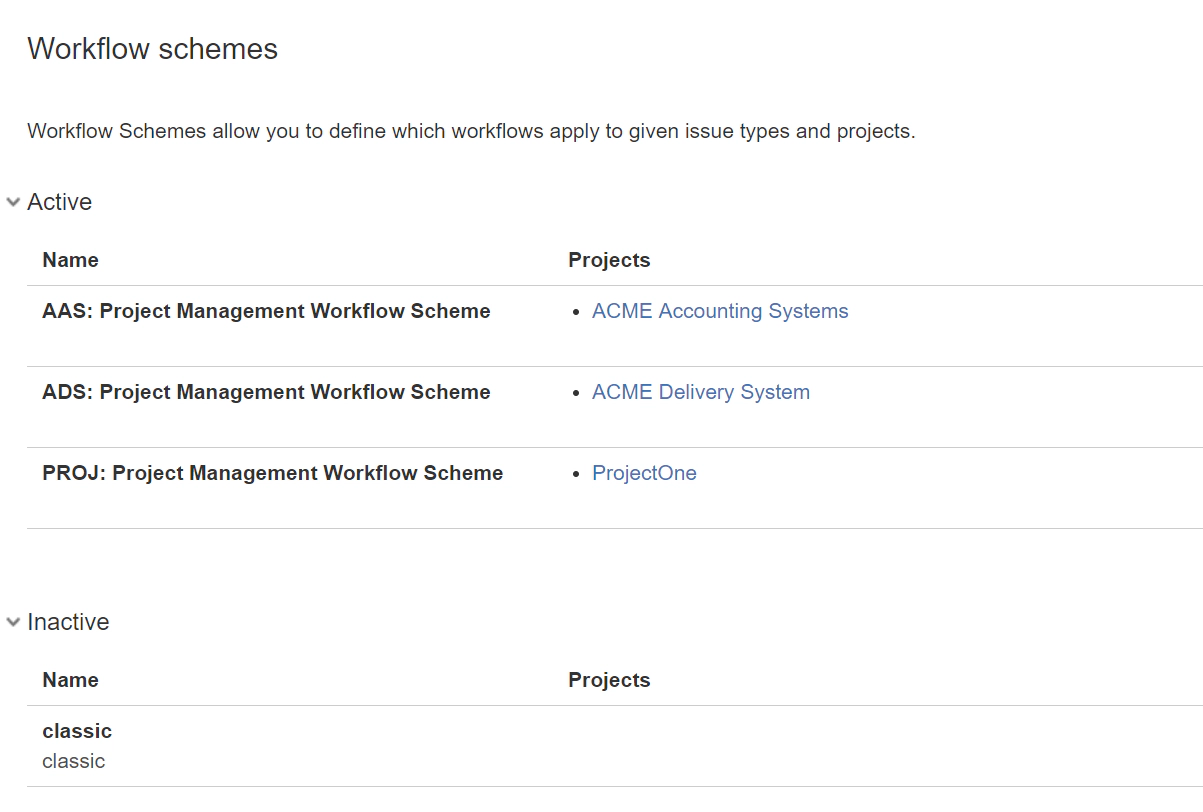
Now we’ll see all the workflow schemes. Those that are available but which have not been assigned to any projects (Inactive). And those that are available and have been assigned to a project (active)
Click on the link under the ‘Workflow’ heading for a row.

Then you’ll be taken to the page where the workflow and status vaules are defined. You can view the workflow in both ‘Text’ (what you see now) and ‘Diagram’ form. Click on the ‘Diagram’ button to see the workflow diagram

On this page you’ll see the status values, linked by transition lines in a nice pretty picture format.
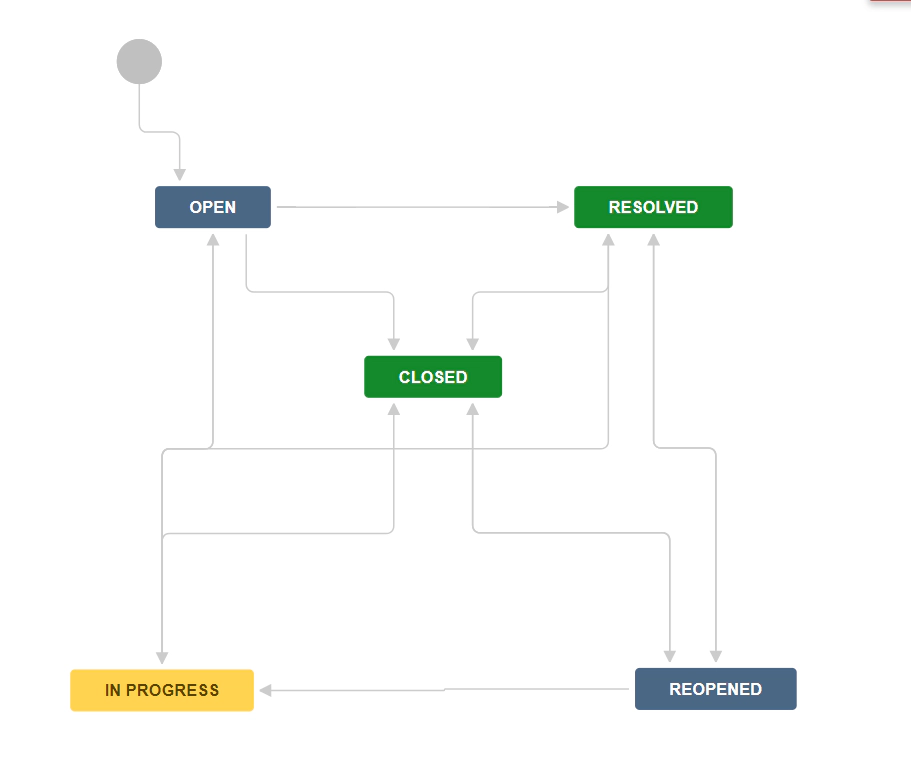
Much easier to digest I think you’ll agree. What you’ll also notice is that this workflow (the ‘Classic’ workflow) is a little more complicated than our simple ‘ToDo -> In Progress -> Done’ workflow that we’ve seen already.
No matter that it’s more complicated. What we want to focus on is applying this different workflow scheme to our project. We’ll show you how to do that next.
Please note that the following is optional! If you’re happy with the simple ‘ToDo -> In Progress -> Done’ workflow you already have then leave things as they are and DON’T apply what follows. If you’re a little more adventurous then you can follow the next set of steps and implement a slightly more advanced workflow.
Changing the Workflow Scheme Applied to a Project
To change the workflow for a project first select your project.
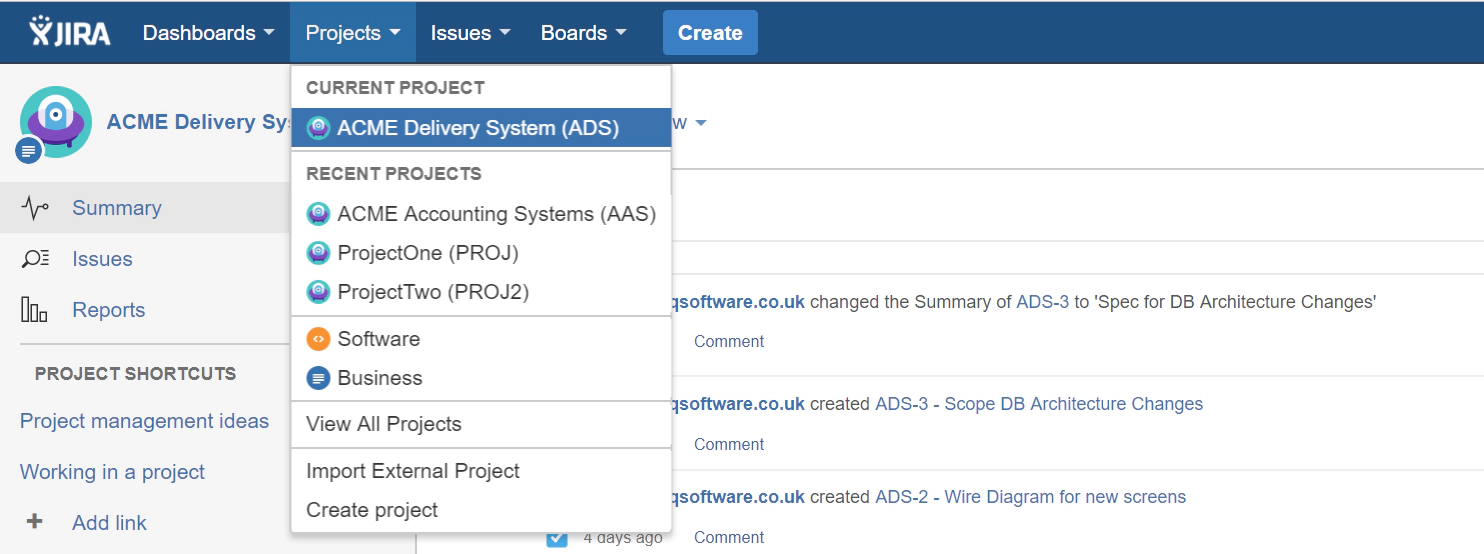
Then from here, bottom left, you’ll find the ‘Projects Settings’ link.

Once you’re on the Project Settings page you’ll see the workflows option in the list of settings:
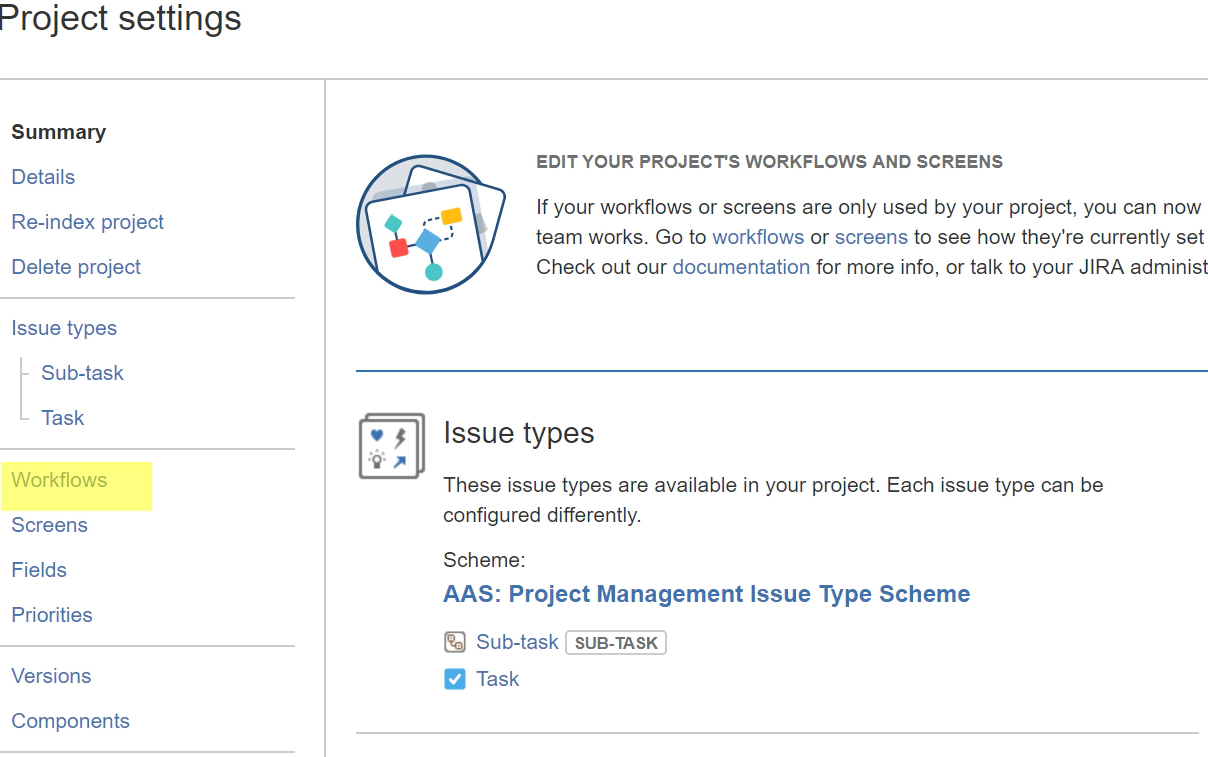
Once you’ve selected that you’ll see the option to ‘Switch Scheme’.

When you select this you might get prompted to enter your Admin password. We’re into Jira configuration and settings now so Jira needs to know you have the privileges to do this. If you’ve followed through from the start you should just be able to enter your password again and continue to the ‘Associate Workflow Scheme’ page.
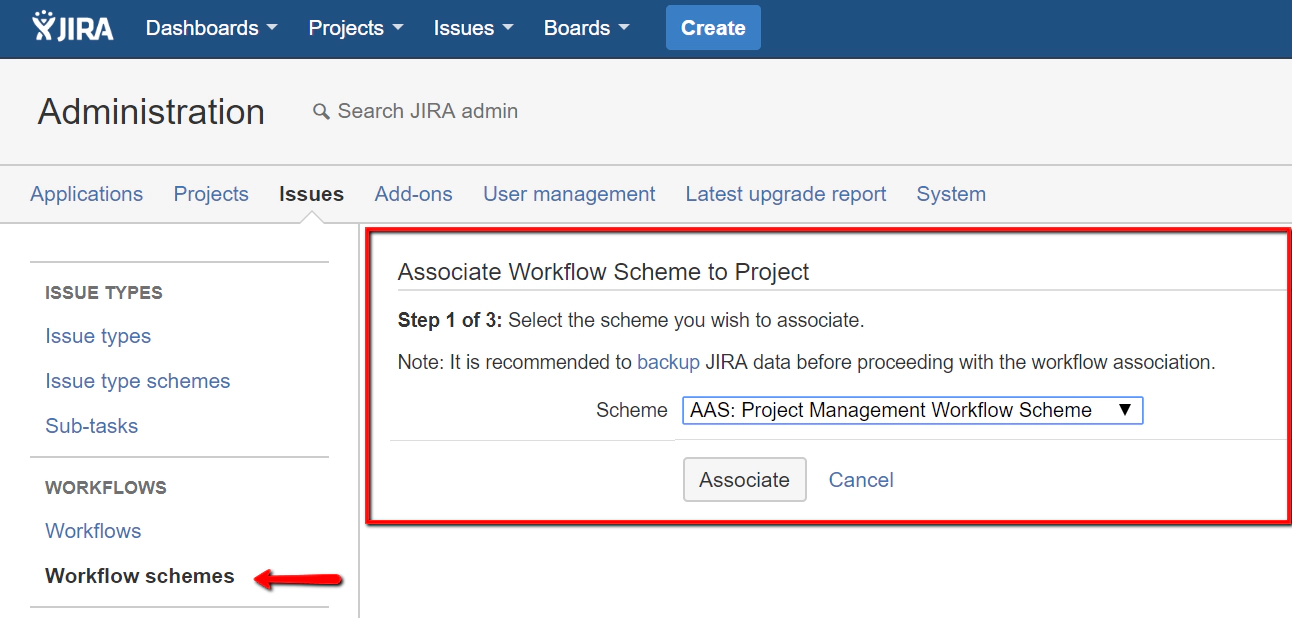
From here we’ll want to change to our ‘Classic’ scheme. Select ‘Classic’ from the drop down and click the ‘Assoiciate’ button.

The next page looks quite intimidaing but it’s not as bad as it seems. We have a set of status values in our current workflow. And we have a different set of status values in the new workflow we’re moving to. For all our existing issues Jira just needs to know how we’re going to map these different status values. What we want is to map like this…
Current New
TO DO Open IN PROGRESS In Progress Resolved Reopened DONE Closed
A few things worth pointing out:
1. You’ll notice that there are more status values in our New workflow. You wont have current values to map to these
2. In the list presented even though you might have a current status value, say ‘In Progress’, if you have NO issues in that status you won’t need to define the mapping.
In our example Jira starts out suggesting this mapping for our ‘Task’ issue types:

Notice that Jira is telling us that we have 10 issues of issue type ‘Task’ that are impacted by this mapping. It’s telling us that those 10 issues are in either a ‘TO DO’ or ‘DONE’ state. So it’s just those states (for those 10 issues) that we need to instruct Jira on the mapping. So we’ll select the right mapping and click ‘Associate’.

When you click the assoicate button Jira will show you the progress page and once complete you can click ‘Acknowldege’. At which point you should see the Project Settings page which confirms that your project is now operating off the ‘Classic’ workflow scheme.

Let’s see how this Classic workflow scheme operates when we create and work with a new issue.
Using the Classic Workflow Scheme
To see what happens with this new workflow click on the ‘Create’ button at the top of the page:

On the create issue screen make sure you have the correct project selected and the Issue Type of ‘Task’. Then click ‘Next’

On the create page enter details for the mandatory fields (Summary and Reporter).
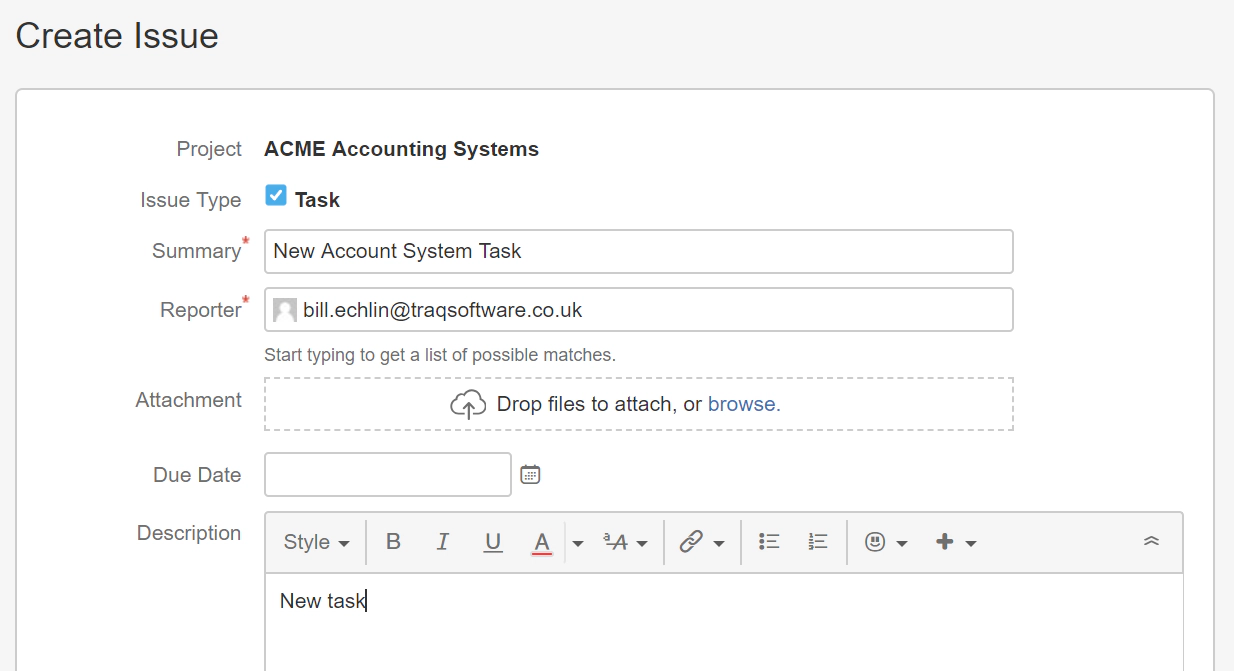
Once you’ve created the task you can confirm that the initial starting status is Open (which is the default status from our new Classic Workflow Scheme).
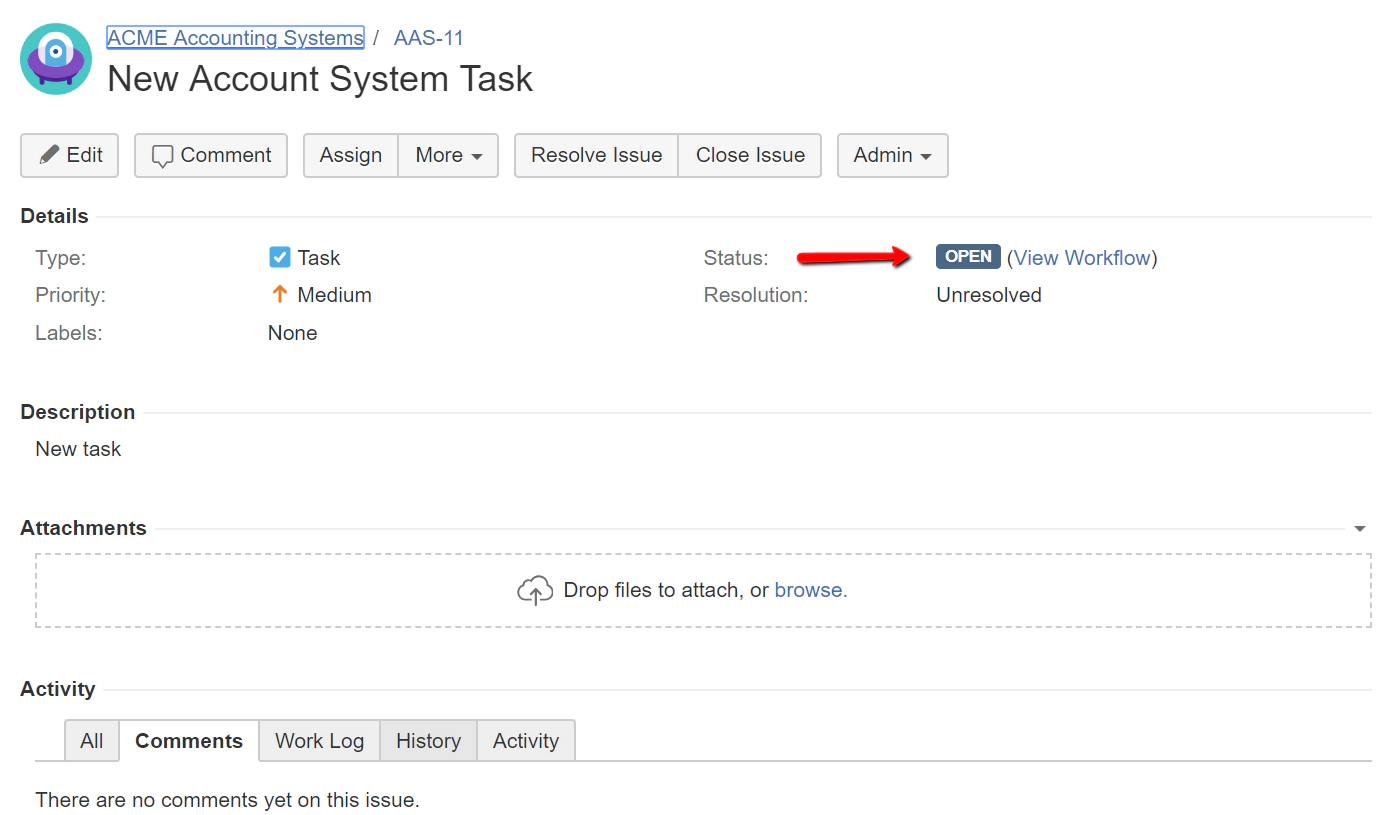
And if you click the ‘View Workflow’ link you can see a graphical representation of the workflow this issue will follow:
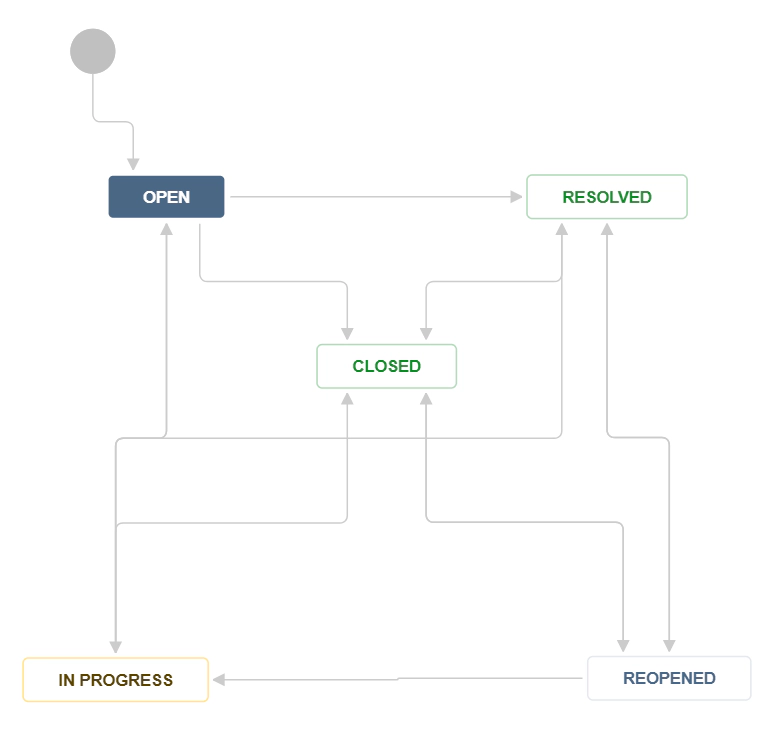
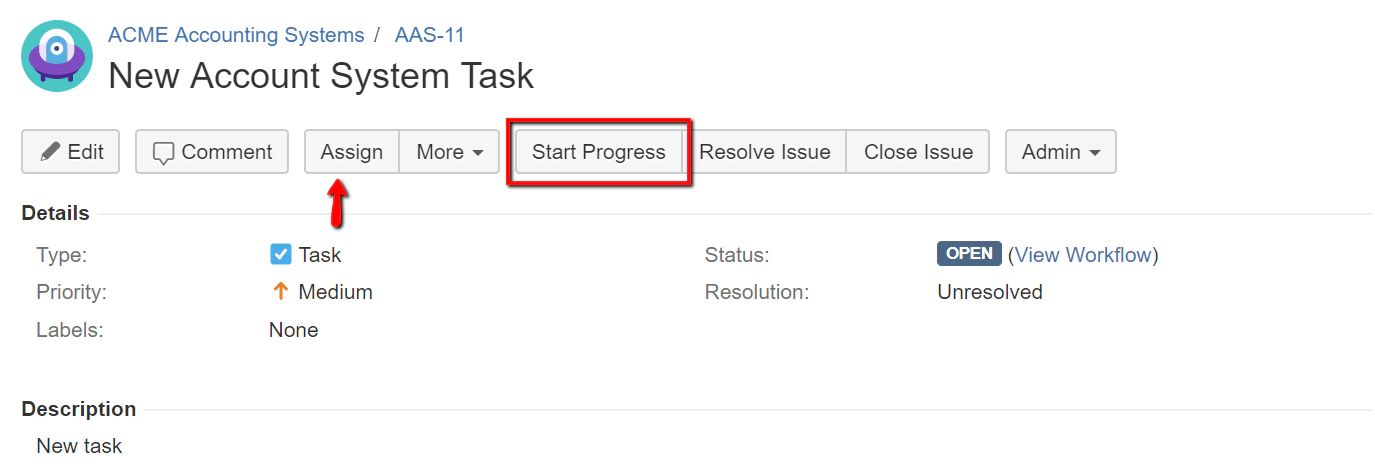
And if you close this dialogue box you can step your issue through the various stages in the workflow with the Assign, Resolve Issue and Close Issue buttons.

Note that you have to assign the issue to yourself before you’ll see the ‘Start Progress’ button that allows you to move this issue into an ‘In Progress’ state.
Summary
As I’m sure you’re starting to realise there’s a lot more to this workflow stuff than first meets the eye. In fact we could do a complete course on just workflow based topics. However, so long as you understand the importance of the issue status values and you can transition your issues through the workflow (using the buttons like ‘Start Progress’ and ‘Done’) then you’ll get by just fine. If you take the time to understand the purpose of workflow schemes, applying those schemes to new projects and converting existing projects to new schemes then you’ll find you start to get far more out of Jira. Jira is supposed to be there to help you track work in the real world. The closer you match your Jira workflow to the workflow you’re following in the real world the more Jira can help you. Creating your own worlflows (as opossed to just selecting a workflow that’s already defined) is a topic we’ll pick up on another day.
